
Here is a short tutorial for a crochet technique that is perfect for hats, bags and home decor accessories. This short tutorial includes instructions for Crochet In The Round. Instructions for a couple of practice pieces that make useful little circular coasters.


There are two techniques for Crochet In The Round
The first technique requires joining the first and last stitches of each round together with a slip stitch. So, you end the round with a slip stitch in the beginning stitch, then make a chain per the instructions in your pattern and continue the round. This method of crocheting in the round creates a visible seam and I don’t believe there is any way to avoid this.
The second technique, and the one preferred by Nancy Brown-Designer does not require a slip stitch joining. In fact, there is no joining at all. Sometimes referred to as spiral rounds, you simply work in a continuous circle and there is no visible seam.
I really only use the second technique or the spiral rounds technique for my hat and bag patterns. For the spiral rounds technique of Crochet In The Round, I use two different methods and have provided instructions for a practice piece for each method.
Practice Crochet In The Round
For each practice piece you will need a worsted weight or size 4 yarn and a U.S. size H crochet hook. The circles below are crocheted in Simply Soft by Caron Yarns which produces a gauge of 4 sts = 1″ and 3 rnds = 1″. The gauge is just a guideline as for this practice piece gauge is not a requirement.
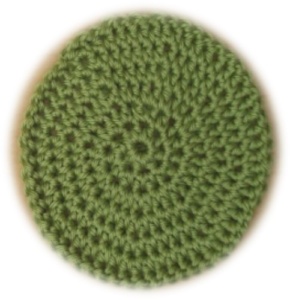
Instructions for the First Method (see green circle below)
Rnd 1: Beginning at the center of circle, ch 2 and work 8 hdc in second ch from hook. DO NOT join, work in continuous rnds throughout. Place a marker at the beg of rnd and move marker up each rnd.
Rnd 2: Work 2 hdc in each st around = 16 sts.
Rnd 3: Work 2 hdc in each st around = 32 sts.
Rnd 4: * Work 1 hdc in each of next 3 sts, 2 hdc in next st. Repeat from * around = 40 sts.
Rnd 5: * Work 1 hdc in each of next 4 sts, 2 hdc in next st. Repeat from * around = 48 sts.
Rnd 6: * Work 1 hdc in each of next 5 sts, 2 hdc in next st. Repeat from * around = 56 sts.
Circle should measure approximately 4 1/2″ in diameter or across.
Note: You are increasing 8 sts evenly spaced each rnd. You can continue increasing in this manner until your circle is the size you want it to be. This method should produce a fairly flat piece and would be perfect for place mats, coasters, special little pieces for the kitchen, the patio or anywhere.
Edging: When your circle is the desired size, it probably needs some sort of edging. So, the easiest thing you can do is: At the end of the last rnd, * sl st in next hdc, ch 1. Repeat from * around ending with sl st in beg sl st and fasten off. Work in all ends.
Instructions for the Second Method (see pink circles below)
Rnd 1: Beginning at the center of circle, ch 2 and work 8 hdc in second ch from hook. DO NOT join, work in continuous rnds throughout.
Rnd 2: Work 2 hdc in each st around = 16 sts.
Rnd 3: Work 2 hdc in each st around = 32 sts.
Rnd 4: * Work 1 hdc in each of next 5 sts, 2 hdc in next st. Repeat from * around. DO NOT join, just continue in rnds as established until your circle measures 4 1/2″ in diameter or across.
Note #1: You will need a ruler or tape measure (see photo below) to determine the diameter. To make sure the circle measures the desired diameter you will need to measure in a couple of places.
Note #2: This method is fast and easy, no need to move a marker up each rnd.
Note #3: The circle may not lay as flat as the circle in the first method, but is perfect for hats as you want the hat to start taking the shape of your head.


I tend to use the first method for purses and bags that have a round bottom and I use the second method for beanies, berets, caps and cloches that use half double crochet as the main stitch.
What is the Best Stitch for Continuous Rounds
Single crochet (sc) and half double crochet (hdc) are the preferred stitches to use for crocheting in continuous rnds because of their short height. Using these shorter stitches ensures that there is not a big difference in the beginning of the round and the end of the round, which allows for a more seamless look. The half double crochet is my stitch of choice, mainly because of the look of the fabric that is created when using this stitch in the round. It seems as though the single crochet stitch produces a stiffer fabric and is less pliable.
Best Selling Patterns
Here are a few of my best selling hat and bag patterns that are crocheted in half double crochet in the round.


To purchase the above patterns to and view my pattern collections, please go to my other website – Nancy Brown-Designer.
Please go to My Pattern Collections pull-down on the Main Menu. There are pull-down menus for Patterns for Hats and Patterns for Bags and Purses as well as menus for other crochet wearables and home decor.
I hope you enjoyed this little tutorial on Crochet In The Round and have been inspired to give it a try. I think you will enjoy creating your own couture collection of hats, bags and purses that are crocheted in the round. I would love to have you leave a comment on your crochet experiences with Nancy Brown-Designer patterns.
Best crochet wishes,
Nancy
Abbreviations:
ch = chain
hdc = half double crochet
rnd or rnds = round or rounds
sc = single crochet
sl st = slip stitch
st or sts = stitch or stitches